-
 Teri Lyn Fisher
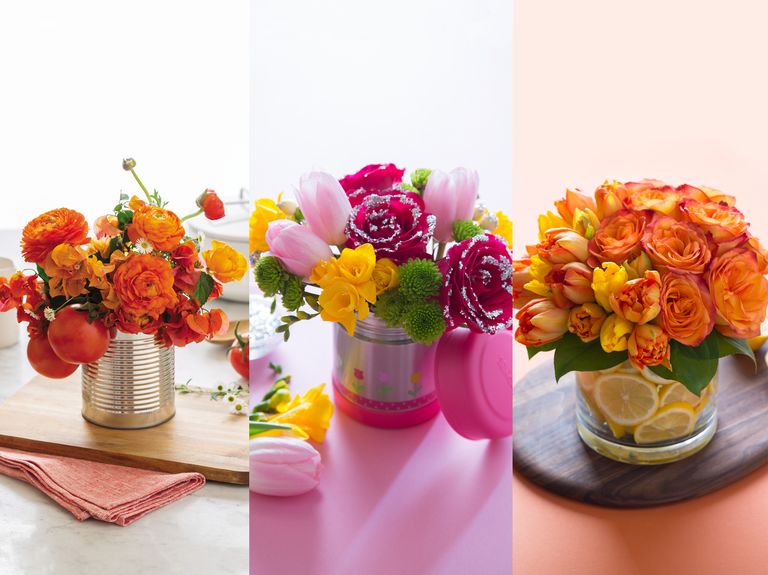
After giving us some priceless insider info on
arranging your own florals, Carly Cylinder shared three DIY projects from her new book that are absolutely perfect for spring.Not only that, they’re ideal for all those parties leading up to your wedding day that may not warrant a budget for professional blooms, but you still want some fresh arrangements adding to the décor. See Cylinder’s tips from her book
The Flower Chef below. -
Citrus Shine
 Teri Lyn Fisher
Feel free to experiment with any type of citrus when lining a vase—limes, lemons, oranges, grapefruit—anything would work. It looks fancy, but there’s an easy trick to this design: I place a slightly smaller vase inside a larger vase, filling the space in between with the sliced fruit. The key is to make sure that the smaller vase is only about one-quarter- to one-half-inch narrower than the larger vase, since the narrower the space, the less fruit you need to fill it.
SEASON: year-round DIFFICULTY: 2 COST: $
You’ll Need:
- Smaller vase, pint glass or plastic storage container
- Medium cylinder vase
- 6 lemons
- knife
- 1 bunch of orange tulips or yellow/orange parrot tulips
- 1 bunch of yellow tulips
- 1 bunch of orange spray roses or 8 to 10 stems of regular roses
- Thick green floral tape or rubber bands
- Scissors
- 3 stems of lemon leaves
Directions:
1. Fill the smaller vase, pint glass or plastic container three-quarters full with water. Place it inside the medium vase.2. Slice the lemons about 1⁄8″ to 1⁄4″ thick, depending on how much space there is between the two vases.
3. Place the lemon slices in between the two vases, until the space is entirely lined with lemon slices. The slices will overlap. You can cut the lemon slices in half to better fit at the top of the vase.
4. Prep all the flowers.
5. Spiral the tulips together so that the orange and yellow flowers are evenly mixed. Secure the bouquet with floral tape or a rubber band and set aside.
6. Spiral the roses together. Secure with floral tape or a rubber band.
7. Cut the stems of each bouquet so the flowers rest on the edge of the vase.
8. Place the bouquets side by side inside the inner vase. If the arrangement doesn’t look full or round enough, fluff or tug gently at the flower heads to create a fuller, more domed look.
9. Cut the lemon leaves to 3″ to 4″ long. Create a collar of leaves around the flowers by placing the stems inside the inner vase, so the leaves drape over the entire circumference of the outer vase.
Design Tip:
You can really use anything to line the vase—berries, seeds, legumes or candy, which is especially colorful for the holidays—although be mindful of the temperature to make sure the candy doesn’t melt. It’s also fun to match the flowers to what you’re using to line the vase. So if you use orange slices, use some orange flowers. If you use limes, use a bright green flower like a spider mum or button mum to tie it all together. -
-
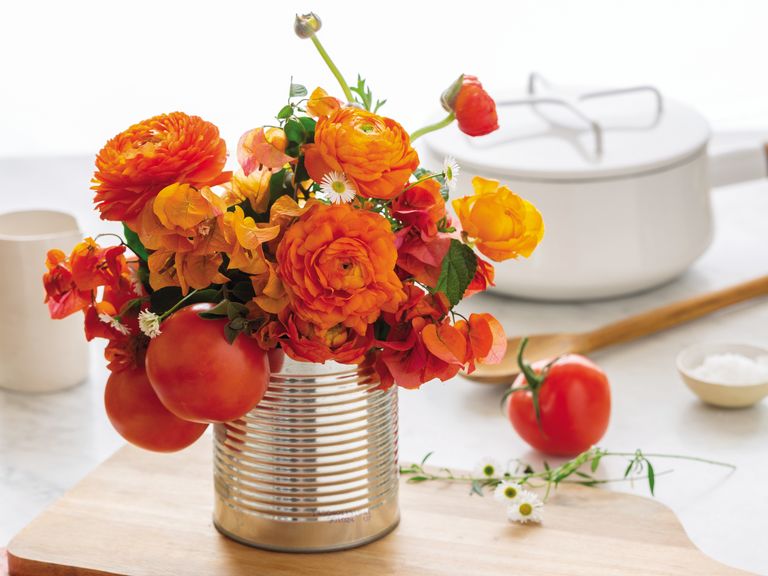
Tomato Can Flowers
 Teri Lyn Fisher
Hosting a farm-to-table luncheon? Get your florals involved! Non-floral elements like vegetables, fruits and herbs are perfect to include in centerpieces and add a lot to the décor.
SEASON: Year-round DIFFICULTY: 2 COST: $
You’ll Need:
- Empty tomato can
- Water
- Clear floral tape
- 2 handfuls of mixed flowers cut from the backyard (bougainvillea, asters, lantana, greenery) or 1 premade wildflower bouquet with a mix of flowers
- Scissors
- 1 bunch of orange ranunculus
- 3 to 4 very firm tomatoes on the vine
- Optional: floral pick or kebab stick, thick green floral tape
Directions:
1. Fill the can halfway with water. With the clear floral tape, make a 3 x 3 grid over the opening of the can.2. Remove any leaves from the bottom half of the backyard (or bouquet) flowers and cut them to about 6″ to 8″ long. Place the mix of flowers evenly throughout the can. Pull up any stems that fall down. The blooms should extend out from the can an inch or two on each side.
3. Prep and cut the ranunculus to about 7″ to 8″ long. For the ranunculus that have multiple small buds on thinner, secondary stems, cut them off where they meet the base of the main stem and set aside.
4. Place the ranunculus evenly throughout the arrangement, clustering 2 to 3 stems together in some areas for impact.
5. Pull the ranunculus up and out toward the edge of the arrangement so they are slightly higher than the backyard flowers. The design can be slightly asymmetrical.
6. If the tomatoes are small, about 2″ in diameter, you can place their attached vine inside the can as described below. If it feels like the tomatoes are too heavy or the vine won’t stay in the can, secure the vine to a floral pick or kebab stick with thick green floral tape. Cut the stick to the same height as the can. Place the vine (whether on a stick or not), in the front left portion of the can, and rest the tomatoes on the can’s rim or allow them to hang over the side.
Design tip:
As an alternative, you could spray-paint the can gold or copper for an inexpensive yet beautiful look. If you do so, I’d recommend sticking with white and cream flowers, adding in touches of buttery yellows and peaches or simple greens. -
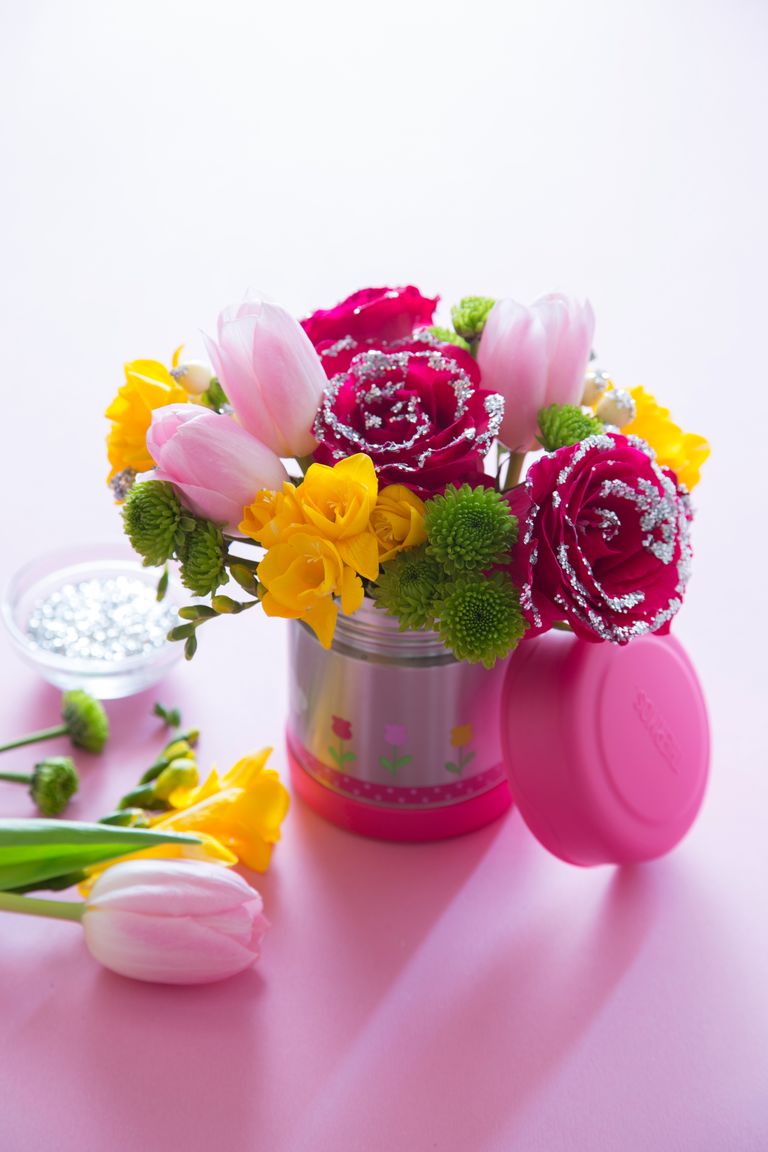
Glitter Fest
 Teri Lyn Fisher
For an afternoon of wedding crafting with your girls, what’s better than a few blooms with DIY details of their own to get everyone in the mood?
You’ll Need:
- 3 stems of hot pink roses
- 1 bunch of green button mums (or 3 to 4 stems)
- 1 bunch of yellow freesia
- 1 bunch of pink tulips (or 3 to 4 stems)
- Scissors
- Thermos
- Clear glue or egg whites
- Paper plates
- Silver glitter
Directions:
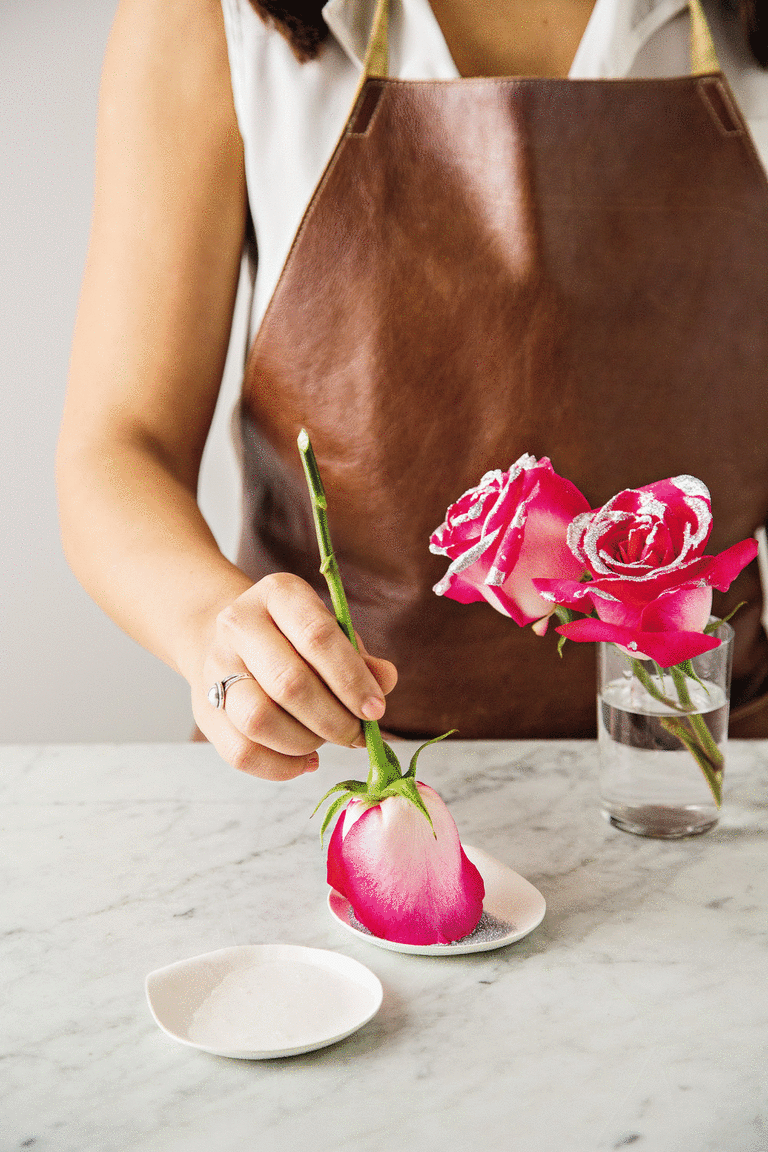
1. Prep the flowers and cut all the stems to about 6″ long. Fill the thermos three-quarters full with water.2. Spread clear glue or egg whites on a paper plate. Put a pile of glitter on another paper plate.
3. Dip each rose head lightly into the glue, and then into the glitter, as if you’re breading chicken. Lightly shake off any excess glitter.
4. Set the roses on a clean paper plate so that the blooms hang off the edge. Dry for 10 minutes.
5. Place the mums in clusters evenly throughout the outer edges of the thermos, so the flowers are leaning against the edge.
6. Place 2 roses in the middle of the arrangement and have the third rose resting on the rim of the vase. Each rose should have room around it so it can breathe.
7. Insert the freesia in clusters of 2 to 3 stems, evenly balanced throughout the arrangement.
8. Fill in any empty spaces with the tulips, angling them outward.
Design tip:
Experiment to discover the color combinations you like best. Some of my favorites are: yellow/pink, plum/light green, bright red/burnt orange, and bright yellow/light green.Want even more of Cylinder’s designs? Make sure to pick up The Flower Chef for more than 80 arrangements and countless helpful tips!
All recepies exported from the book The Flower Chef by Carly Cylinder. Copyright 2016 by Carly Cylinder. Repritned with permission of Grand Central Life & Style. All rights reserved.
-